
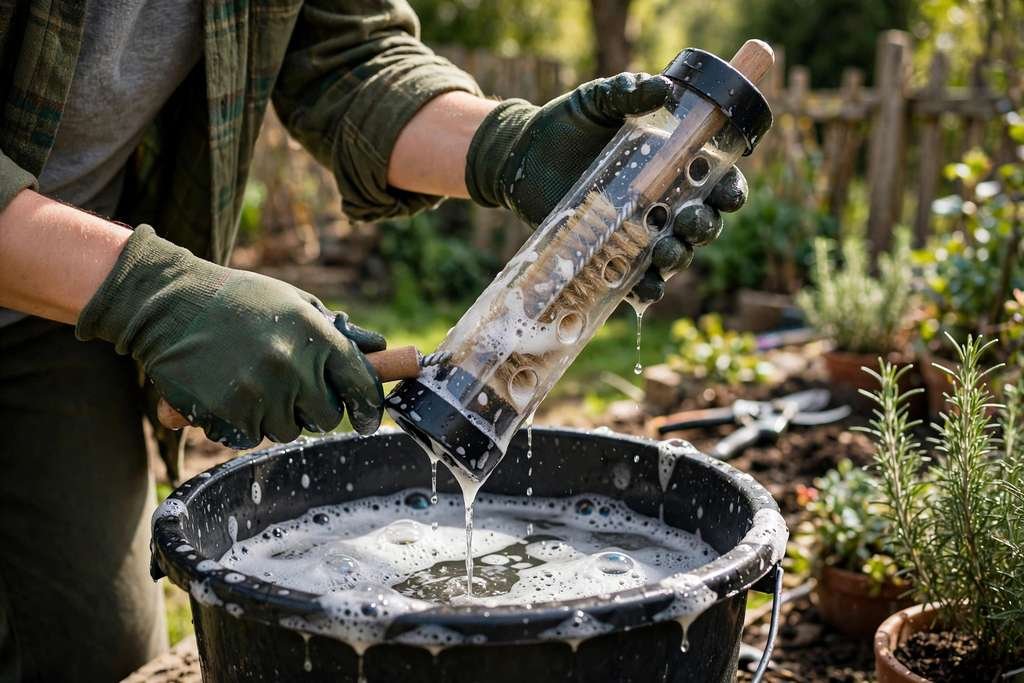
I used to think a full feeder was a healthy feeder — until the spring I noticed a goldfinch with crusty, swollen eyes clinging to my tube feeder, and within two weeks my regulars had nearly vanished. That was the season I learned the hard truth about how to clean bird feeders — or rather, what happens when you don’t. (For the deeper story on which diseases spread at feeders and the research behind the bleach method, see our feeder hygiene guide.)
Here’s what nobody tells beginners: a dirty feeder is a disease hotspot. Moldy seed hulls, droppings caked on perches, and damp corners breed salmonella, trichomoniasis, and finch eye disease, and birds pass them to each other beak-to-perch every single day. The good news? The fix takes 20 minutes and a bucket. Here is the exact 7-step routine I follow now.
Why Cleaning Your Bird Feeders Matters
Birds don’t get sick from “dirty” the way we think of it — they get sick from concentrated contact. In the wild, birds spread out. At your feeder, dozens of birds rub their faces on the same few feeding ports, stand in each other’s droppings, and pick through the same damp seed. That crowding is what turns a feeder into a transmission point.
The big three feeder diseases are worth knowing by name: salmonellosis (spread through droppings), trichomoniasis (a parasite passed in saliva on shared food and water), and mycoplasmal conjunctivitis — “finch eye disease,” the crusty swollen eyes I saw on that goldfinch. All three get worse when feeders go uncleaned, and all three decline when feeders are cleaned regularly. A filthy feeder can also quietly explain why birds suddenly stopped visiting your feeder — birds avoid feeders that smell of rot and decay.
How to Clean Bird Feeders in 7 Simple Steps
1. Take the Feeder Down and Empty It Completely
Put on disposable gloves first — some bird bacteria can make humans sick too. Take the feeder down, dump every bit of old seed into the trash (never onto the ground, where it just feeds the problem), and knock out loose hulls and debris. If the seed smells musty or looks clumped, it was already growing mold — good riddance.
2. Disassemble It Fully
Mold and droppings hide where you can’t see them: inside port holes, under trays, behind perches. Take the feeder apart as far as it goes — remove perches, trays, lids, and port covers. If a part won’t come off, at least make sure you can reach every surface with a brush. This single step is what separates a real cleaning from a cosmetic rinse.
3. Scrub Off All Visible Debris
Before any disinfecting, dry-scrub everything with a stiff bottle brush or old toothbrush. Pay special attention to feeding ports and perches — that’s where birds rub their faces, so it’s where pathogens concentrate. Get every speck of caked seed, droppings, and webbing off. Disinfectants can’t do their job through a layer of grime, so don’t skip the elbow grease.
4. Soak in a Disinfecting Solution
Here’s the step most people get wrong. Plain soap and water is fine for routine washing, but research found a diluted bleach soak more effective at removing bacteria than soap and water alone — feeders cleaned with only soap still carried enough salmonella to risk disease transmission.
My go-to recipe, straight from the Cornell Lab’s Project FeederWatch: 1 part household bleach to 9 parts water (a 10% solution), soak all parts for 10 minutes. Do it outside in a bucket, wearing gloves.
Prefer to avoid bleach? A vinegar-water soak method works as a gentler alternative — equal parts white vinegar and water, soak up to an hour. It’s less potent than bleach against heavy contamination, but fine for light, regular cleanings.
5. Rinse Thoroughly — Then Rinse Again
This step is non-negotiable: rinse every part under running water until there is zero chemical smell left. Bleach residue is toxic to birds, and vinegar residue, while harmless, can put birds off the feeder. When you think you’re done rinsing, rinse once more. I hold each piece up and smell it — if I catch even a whiff of bleach, it goes back under the tap.
6. Let It Air-Dry Completely
A damp feeder grows mold faster than a dirty dry one, so don’t rush this. Lay all parts on a clean towel in the sun if possible — sunlight is a natural disinfectant — and wait until everything is bone dry before reassembling. In humid weather this can take a few hours. I clean my feeders in the morning so they’re ready to hang by afternoon.
7. Refill With Fresh Seed — and Clean the Ground Too
Refill with fresh seed, never the old stuff you dumped out. This is also the perfect moment to upgrade what you’re serving — I refill with the best bird seed for backyard birds I keep on hand, since fresh quality seed molds slower than cheap dusty mixes.
Then don’t forget the ground: rake or shovel up droppings, hulls, and spilled seed under the feeder. That waste layer is unhealthy for birds and pets, and it attracts rats and mice drawn to spilled seed — plus night raiders (see how I keep raccoons away from bird feeders). Project FeederWatch recommends moving feeders periodically so waste never builds up in one spot — my guide on where to place a bird feeder covers how I rotate mine.
Feeder Cleaning Schedule
| Feeder type | How often | Method |
|---|---|---|
| Seed / tube / hopper feeders | Every 2 weeks (more in heat or heavy use) | Disassemble, scrub, 10-min bleach soak, rinse, air-dry |
| Hummingbird feeders | Every 2–5 days / every nectar refill | Hot water + bottle brush, no soap residue; discard cloudy nectar |
| Suet feeders | Every 2 weeks | Scrape off old suet, scrub, bleach soak, rinse, dry |
| Bird baths | Weekly (daily in hot weather) | Scrub + 10% bleach solution, rinse well, refill with fresh water |
| Ground under feeders | Weekly | Rake/shovel droppings and hulls; rotate feeder location periodically |
My rule of thumb: if I can’t remember the last cleaning, it’s overdue. I do mine on the 1st and 15th of every month — it takes 20 minutes for three feeders once it becomes a habit.
6 Common Mistakes to Avoid
- Using bleach straight from the jug. Undiluted bleach is overkill and dangerous — residue can kill birds. Always dilute 1:9 and always rinse thoroughly.
- Skipping the rinse. The most common mistake I see. If you can smell chemicals, so can the birds — and for them it’s toxic, not just unpleasant.
- Refilling while still damp. Moisture + seed = mold within days. Bone dry or don’t refill.
- Forgetting the ground below. You can sterilize the feeder perfectly and still have a disease problem if birds are foraging through droppings and moldy hulls underneath it.
- Dishwasher without checking. A hot dishwasher cycle works great — but only if the manufacturer says the feeder is dishwasher-safe. Heat warps cheap plastic and destroys wooden feeders completely.
- Seeing a sick bird and doing nothing. Puffy, crusty-eyed, or lethargic birds at your feeder are a red alert: take feeders down for at least two weeks, disinfect everything, and let the flock disperse. Doing nothing lets one sick bird infect dozens.
Frequently Asked Questions
How often should I clean my bird feeders?
About every two weeks for seed and suet feeders — more often during heat waves, heavy use, or damp weather. Hummingbird feeders need it every 2–5 days since sugar water grows bacteria fast. Bird baths: weekly, or daily in hot weather. When in doubt, clean more often; there’s no such thing as a feeder that’s “too clean.”
What’s better for cleaning — bleach or vinegar?
For true disinfecting, diluted bleach wins: 1 part bleach to 9 parts water, 10-minute soak. Research shows it removes bacteria more effectively than soap and water alone. Vinegar (equal parts white vinegar and water, up to an hour soak) is a fine gentler option for light, regular cleanings — just rinse well either way.
Can I just use dish soap and water?
For a quick routine wash, yes — warm water and a drop of dish soap with a good scrub handles surface dirt. But soap alone doesn’t reliably kill pathogens; studies found salmonella surviving on feeders cleaned with only soap and water. Use soap for the scrub, then follow with a disinfecting soak for the real protection.
How do I clean a hummingbird feeder?
Take it apart completely and scrub every part with hot water and a bottle brush — no soap, or rinse extremely well, since residue contaminates nectar. Clean it every time you refill (every 2–5 days), and if the nectar looks cloudy or you see black mold spots, discard the nectar and clean immediately. Tiny port brushes or pipe cleaners reach the feeding holes.
What should I do if I see a sick bird at my feeder?
Act fast: take all feeders (and bird baths) down for at least two weeks, scrub and disinfect everything with a 10% bleach solution, and rake the ground below. Don’t try to catch or treat the bird yourself — only licensed wildlife rehabilitators can legally treat wild birds. Wear gloves handling feeders, and wash your hands after.
Can bird feeders go in the dishwasher?
Yes, on a hot cycle — but only if the manufacturer specifically says the feeder is dishwasher-safe. Many aren’t: heat warps thin plastic, melts glue joints, and ruins wooden feeders. When in doubt, hand-wash. Either way, make sure everything is fully dry before refilling.
Do I need to clean feeders in winter?
Absolutely — disease doesn’t take the winter off, and birds crowd feeders even more tightly in cold months, which increases transmission. Cold doesn’t sterilize anything. Keep your every-two-weeks rhythm year-round, and keep bird bath water fresh (or use a heater) so birds aren’t drinking from icy, contaminated basins.
The bottom line: you don’t need fancy products or a lot of time — a bucket, a brush, a 1:9 bleach soak, and 20 minutes twice a month. That’s the entire system. Since I started this routine, the sick birds disappeared from my yard, my regulars stayed all season, and I stopped dreading what I’d find clinging to the perches each morning. Your birds are worth the bucket.

Related Articles
How to Keep Starlings Away From Bird Feeders: 7 Proven Tips (2026)
Nothing empties a bird feeder faster than a flock of European starlings. One minute your tube feeder is…
Read Article
How to Keep Deer Away From Bird Feeders: 7 Proven Ways (2026)
One October morning, coffee in hand, you walk to the back window expecting the usual rush of chickadees…
Read Article
When to Take Down Hummingbird Feeders: 7 Smart Rules (2026)
Every September, I find myself standing at the kitchen window, coffee in hand, staring at my hummingbird feeder…
Read Article