
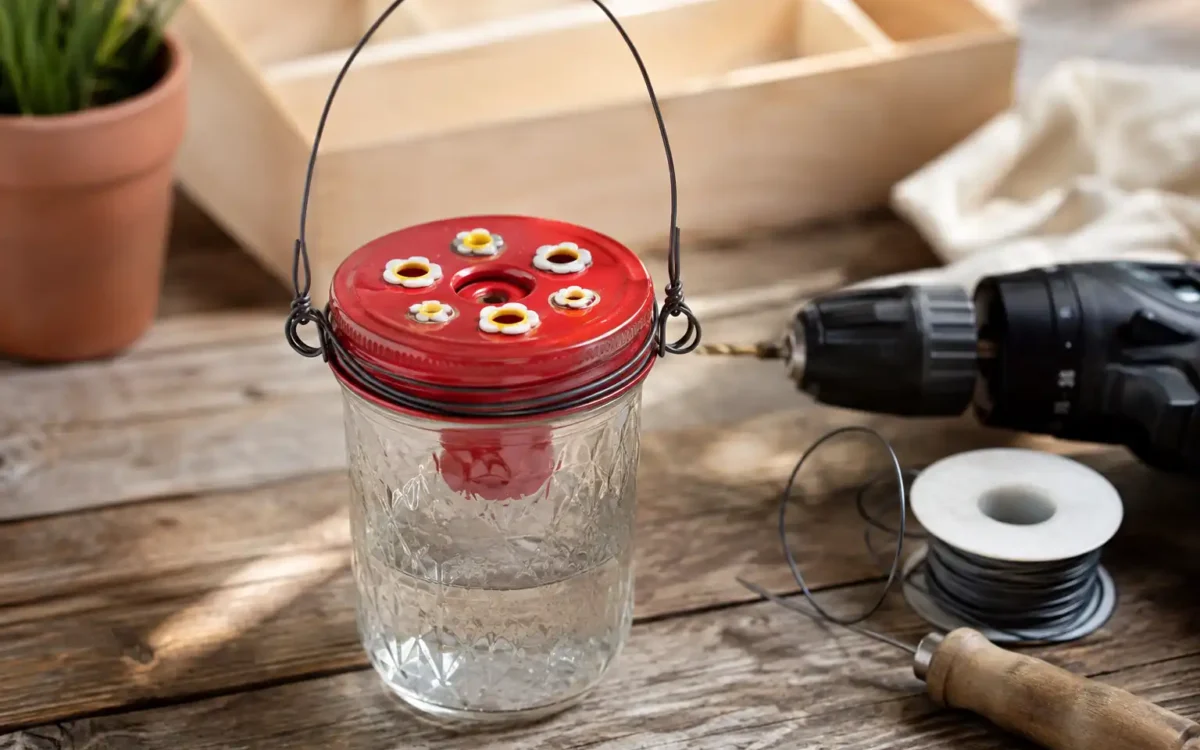
An empty mason jar sitting in the recycling bin was the entire reason this turned into a project in the first place. A DIY hummingbird feeder genuinely doesn’t need much more than that — a container, a way to seal it, and a few small holes sized just right. This guide walks through the builds that actually hold up outdoors, not just the ones that look good in a photo, along with the small details most tutorials skip entirely.
What You Actually Need (Most of It’s Already Around the House)
A genuinely easy DIY hummingbird feeder comes down to three things: a clean container that holds liquid, a lid or stopper that can be punctured, and something sturdy to hang it with. Beyond that, almost any small, clean glass or plastic container works just fine.
Building a hummingbird feeder from recycled materials is less about following one exact design and more about understanding what makes any container work — a secure seal, a way to punch small feeding holes, and a red accent somewhere visible.
A few materials worth avoiding entirely: anything that previously held cleaning chemicals or motor oil, no matter how thoroughly rinsed, and any container with cracks or seams that could leak once filled.
Hole Size Is the One Detail That Actually Matters
More DIY feeders fail on this single detail than anything else. The right DIY hummingbird feeder hole size is between 1/8 and 3/16 of an inch — big enough for a hummingbird’s long beak and tongue, small enough to keep out most crawling and flying insects.
A small nail heated briefly and pushed through a plastic lid, or a fine drill bit through a metal one, both get the job done cleanly. Skipping this step and going too large is the most common reason a homemade feeder ends up attracting more bees than birds. Too small, on the other hand, makes it genuinely difficult for a hummingbird to feed at all, so it’s worth double-checking the size before committing to a full batch of holes.
Mason Jar Hummingbird Feeder: The Easiest Build
A mason jar hummingbird feeder is about as close to foolproof as DIY builds get. Following a basic mason jar hummingbird feeder tutorial: wash the jar and lid thoroughly, drill or punch three to four small feeding holes around the lid’s edge, and thread wire or twine through two opposite holes near the rim to create a hanger.
Once the nectar is mixed and the feeder is filled, our full recipe guide on how to make hummingbird nectar covers the exact ratio and prep method, which matters just as much for a homemade feeder as a store-bought one.
A wide-mouth jar makes cleaning noticeably easier down the line, so it’s worth choosing one over a narrow-necked option if there’s a choice available when digging through the recycling bin.
Plastic Bottle Version (If You Don’t Have a Jar Handy)
A DIY hummingbird feeder from a plastic bottle works on the exact same principle as the jar version. A small soda or water bottle, cleaned out completely, needs a cap with small feeding holes drilled through it and a way to hang it upside down without leaking.
The main difference is stability — plastic bottles are lighter and can swing more in wind, so a slightly shorter hanging length keeps them from spinning as much as a heavier glass jar would in an exposed spot.
Turning Either Build Into a DIY Window Feeder
A DIY window hummingbird feeder just adds one extra step to either the jar or bottle version: a suction cup mount instead of a hanging wire. A small suction hook attached near the container’s rim lets it sit flush against glass, which is especially useful for apartments or anywhere a hanging pole isn’t an option.
Placement still follows the same window-distance safety principle as any store-bought feeder — either right up against the glass or well away from it, never in that middle zone where a startled bird could pick up dangerous speed before impact.
Does It Really Need to Be Red?
Not strictly, though it helps. What color should a DIY hummingbird feeder be comes up constantly, and the honest answer is that red catches a hummingbird’s attention from a distance, but the nectar itself never needs dye. A small piece of red tape, ribbon, or a painted lid accomplishes the same thing without adding anything to the liquid.
Once a feeder has been found and used a few times, color matters far less than consistency — hummingbirds remember reliable locations regardless of the container’s exact shade, returning to the same spot out of habit more than visual appeal alone.
Keeping Bees and Ants Out With a Saucer Design
For anyone specifically trying to figure out how to keep bees out of a DIY hummingbird feeder, a shallow, saucer-shaped build solves the problem at the design level rather than through any added deterrent. Keeping the nectar’s surface lower than the feeding holes means bees can’t reach it with their shorter mouthparts, while a hummingbird’s long tongue still reaches in easily without any trouble.
Ants are a separate issue tied more to leaks and drips than hole size. A DIY feeder that’s prone to dripping during filling is exactly the kind of setup that invites the trail our guide on how to keep ants out of a hummingbird feeder covers in more detail — a tight seal at the lid prevents most of that before it starts.
How to Clean a Homemade Hummingbird Feeder
Learning how to clean a homemade hummingbird feeder isn’t much different from maintaining a store-bought one, though DIY designs sometimes have narrower openings that make scrubbing a little trickier. A bottlebrush reaches most jar necks fine, while a plastic bottle’s cap threads may need an old toothbrush to get fully clean.
Rinsing with hot water between every refill, and doing a deeper vinegar soak every week or two, keeps a homemade feeder from developing the kind of buildup that discourages repeat visits. Since DIY builds often use whatever container was on hand, checking that the material can actually handle hot water safely is worth confirming before the first wash, especially with thinner or older plastic containers.
DIY vs. Store-Bought: Is It Actually Worth It?
Cost is usually the deciding factor for anyone weighing a homemade build against buying one outright:
| Option | Approx. Cost | Best For |
|---|---|---|
| Mason jar DIY | Free – $2 | Using what’s already on hand |
| Plastic bottle DIY | Free | Quick, disposable, kid-friendly builds |
| Basic store-bought feeder | $8 – $15 | Convenience, built-in ant moats or perches |
| Premium glass feeder | $20+ | Long-term durability and easier cleaning |
A DIY build is hard to beat on cost, though a store-bought feeder often wins on convenience over time.
The mason jar version was the first one I actually finished, mostly because it took under ten minutes from start to finish. I drilled four holes around the lid, added a wire hanger, and filled it with nectar that same afternoon.
A hummingbird found it within three days, which honestly surprised me more than it should have — it looked nothing like the glossy feeders in stores, just a jar with some holes in the lid. It’s still hanging in the same spot months later, and the only real maintenance has been refilling it and giving it a quick rinse between batches. The lid has needed replacing once after the threads wore down, but that’s about the only downside worth mentioning.
Frequently Asked Questions
What size holes does a DIY hummingbird feeder need?+
Between 1/8 and 3/16 of an inch works best — large enough for a hummingbird’s beak and tongue, small enough to discourage most insects from getting in.
Does a homemade hummingbird feeder need to be red?+
Not strictly, though red does help catch attention from a distance. A small red accent like tape or ribbon works just as well as a fully red container.
Can I use any container as a hummingbird feeder?+
Most clean, food-safe glass or plastic containers work, as long as they can be sealed securely and hold small feeding holes without cracking.
Is glass or plastic better for a DIY hummingbird feeder?+
Glass tends to be more stable in wind and easier to clean thoroughly, while plastic is lighter and more forgiving if dropped. Both work well when built correctly.
Can kids help make a hummingbird feeder safely?+
Yes, with adult supervision for any drilling or hole-punching step. Assembling, decorating, and filling the feeder are all safe, hands-on parts kids can take on directly.
What’s already sitting in your recycling bin?
Chances are there’s already a jar or bottle around the house that could become a working feeder this weekend, no special trip to the store required. Once it’s up, our guide on how to attract hummingbirds to a feeder covers what happens next — placement, patience, and everything else that gets that first visitor to actually show up.

Related Articles
How to Attract Orioles to Your Backyard (Complete Guide)
A lot of people assume that if hummingbirds are already visiting their yard, orioles will simply show up…
Read Article
How to Attract Birds With Water (Complete Bird Bath Guide)
Last updated: September 24, 2026 · 7 min read Here’s something the seed companies won’t tell you: a…
Read Article
How to Keep Bees and Wasps Away from a Hummingbird Feeder
Most people assume the bright red parts of a hummingbird feeder are what’s drawing bees and wasps in…
Read Article